Wednesday, January 25, 2012

Best Office Application for Android


While some Android devices comes with free office application software bundled, most does not come with any especially the lower and middle end smartphones and tablets. Like me, at one point in the duration of your Android device, sooner or later you'll gonna need an application that is capable of reading and creating office documents. This usually happens when you receive an email attachment in word, excel, powerpoint or pdf format and you need to read, or edit it right where you are. Having an office application in a smartphone or tablet is very essential especially if you are always on the road.

Of course we also have our laptop with us but having our Android smartphone or tablet with office application installed increases our efficiency in the field.

One such application that helps me a lot in my job is the Quick Office Pro. With the Excel application I always have access to my spreadsheets while with the Word application I can always create and read documents quickly without hassles.

One thing very nice about Quick Office Pro is its seamless integration with the Cloud. You can easily share your files with Evernote, Google Docs, Dropbox and many more Cloud based file sharing applications. Furthermore, Quick Office has integrated PDF viewer with advanced features that lets you conveniently access and read documents in this format.

This application is available from the Androidtapp website for $14.99. It's previous price is $19.99 so if you buy it now you'll generate a $5 savings.

Published with Blogger-droid v2.0.3

Best Photo Fun for Android Tablets

For people who loves to post funny pictures in Facebook and other social networking sites to amuse friends, this app is for you. You can easily alter your images to make it funny without the need for costly photo-editing programs like Photoshop.

The app works by letting you choose from various selection of overlay props available like hats, glasses and most facial accessories. You just swipe the props and use the slider control to position those into your face images. I suggest you use this app for low to medium resolution photos only as it tends to lag with high resolution ones.

This app does have many limitations with regards to manipulation hence its end products are best used for gags only for sharing in Facebook and the like.

One thing cool about this is, it's free! And you can download it from Androitapp.


Published with Blogger-droid v2.0.3

Monday, January 23, 2012

How to Remotely Control Your PC Using Android


If you would like to maximize the use of your Android tablet or smartphone, like adding functionality to remotely control your computers at home or office wherever you are, there is a very nice application for that.

The app is called “IMPERIO Remote Desktop”. It basically enables you to manipulate and control all of your computers remotely right in your Android device. It has a wake on LAN feature which enables you to open up your computer even if it is asleep.

This app is very suitable for people who are always on the go and needs to be constantly connected to their home or office computer. It is very fast and you can even use it to run a slideshow presentation wherever you are located in the world. Running apps, playing music or whatever task you need to be done, is handled by IMPERIO Remote Desktop with ease.

Get it now from Androidtapp.com for a discounted price of $3.99. It used to be $15.99 so the current price is a real bargain.

Wednesday, January 11, 2012

How to Reset Samsung Galaxy Y to Default Factory Settings

The Samsung Galaxy Y has options for you to Reset to factory data your phone through the Settings page which is useful if your phone is still working when you want it restored for reasons like you are transferring ownership of the phone to other person or you just like to wipe out your data and start anew.

Be sure to always make a backup of your important files so that when times like this that you are forced to do a factory reset, you can always go back and restore your important files.

When your phone becomes unresponsive due to a crash, you cannot do it through the Settings page so your only option is to do a hard reset using the hardware buttons of the Samsung Galaxy Y. To do it, remove the battery first and then put it back again after about two seconds. Do not power up yet. Just press the Volume up, Home button and Power button simultaneously at the same time and wait for the menu that will appear with options. Use the volume button to toggle the selection and select “Wipe/Factory Data Reset”. After the phone is rebooted, you have a spanking new interface to fiddle with.

Another easier way to reset you Galaxy Y is to dial this code *2767*3855#. Your phone will revert to default factory settings upon reboot,

Tuesday, January 10, 2012

Hide your Videos and Pictures using Pandora

I recently came across a free app from the Android Market which lets you secure your personal video and picture files with a password. It installed it and it worked great for my Samsung Galaxy Y. One thing very good about it is there is no limit on the number of pictures and videos that you want to keep in your private folder. I once used another app of the same functionality but since it is free, there was a limit on the number of files that you can keep. The unlimited one comes at a cost.

This one called Pandora is very helpful in securing your personal photos and videos and usage is very easy. Just set a password for it and as it displays the pictures and photo files inside your Galaxy Y, you just tap to classify each as public or private and your set. You can now avoid embarrassing situations when people accidentally opens picture and videos that you would normally keep for your eyes only.

Though I haven't experienced losing some photos and videos like what other users posted on the review in the Android Market.  I must warn you of this so please use the app with caution.

Saturday, January 7, 2012

How to Use MP3 Music Files as Ring Tone in Samsung Galaxy Y

The sound settings of Samsung Galaxy Y does not automatically add your existing music files from the selection list of ring tones. Only the default ring tones are listed and there is no option for you to browse for existing music files in your smartphone.

To add your music files into the selection list, you will need to create a ringtone folder. Once you create that particular folder and loaded it with your MP3 music files, the system automatically detects it and adds the MP3 files into the selection list of ring tones in addition to the default ones.

The step by step procedure is outlined in the following screenshots from my own Samsung Galaxy Y:

1. Tap on "My Files".


2. Tap on the menu key (left side of the home button) and select "Create Folder" in the pop-up.


3. Name your new folder "ringtones" and tap OK.


4. Navigate to your SD card contents and tap on the "mp3" folder. In my case that folder is where I store my MP3 music files. If you have your own folder where you store your music files, that is what you will select or tap.


4. Select the tune that you would like to use as ring tone.


5. Tap on the menu key and select copy from the pop-up box.


6. Open the "ringtones" folder that you have just created.


7. Tap the menu key and select "Paste here".


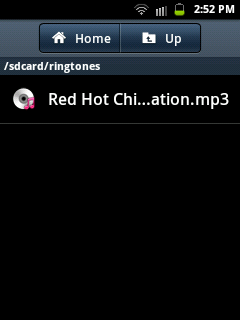
8. The MP3 tune is now inside the "ringtones" folder.


9. Navigate to your home screen and select "Settings".


10. Tap on "Sound".


11. Tap on "Phone ringtone".


12. That's it. Your selected MP3 tune is now included in the selection list of ring tones. click on OK to use the file as ring tone. Just repeat the process the add more MP3 files  in your ring tone selection list.
 

Sunday, January 1, 2012

How to Remove Built-in Shortcuts in Samsung Galaxy Y

If you are one of those Samsung Galaxy Y users who would like to customize your home screens by removing and/or replacing the built-in application shortcuts installed in it, this is for you. Though the process is very very easy, I feel that this post would be very useful to Galaxy Y users. Here are the screen shots and procedure:

1. Long press the icon that you want to delete.  For this example, we will delete the phone shortcut icon.

 2. While holding the icon to be deleted, tap on the pop-up that appears on the bottom of the screen with the word "Remove".
3.That's it. The unwanted icon is gone.